Menu Reference
View -> Texture List
|
Shortcut key: F3
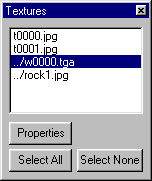
This brings up the texture list dialog. All the textures for the current map and object file are in the
list. Textures that are selected are visible in the editing screen, those that are not selected are hidden.
Select All - Selects all textures in the list.
Select None - Unselects all.
|
 |
|
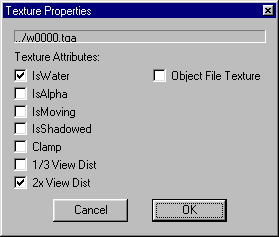
Properties - Availible when only 1 texture is selected. Shows the properties for that texture.
- IsWater - Sets the texture as water. Makes splashing sounds if its shallow (<1m) and makes the
player swim if its deep. The map must have a solid (non-water) triangle under the water. Don't combine
with IsAlpha.
- IsAlpha - Sets tris with this texture as alpha-blended (transparent) tris. Used for chainlink
fence, finish streamers, glass windows, and other stuff. Use these tris sparingly though, as they are a
lot slower than normal tris. This texture should be a .TGA with an alpha channel. Alpha tris are only
visible from one side in the 3D editor (ie the normal side), but in the game they are visible on BOTH sides.
You do NOT need to duplicate alpha tris to have them visible on both sides.
- IsMoving - Used for animated textures (flowing water). Scrolls the texture coordinates along
the TU axis at a constant rate.
- IsShadowed - This texture casts shadows. Use sparingly, certainly not on the entire world, as
it slows things down quite a bit. I suggest controls, rocks, picnic tables, etc... have this set, but
not normal ground triangles.
- Clamp - This clamps the texture coordinates between 0 and 1. As a general rule, the ground tris
generated by the converter or random generator should have this set, everything else shouldn't. Only set
it if you notice weird colors bleeding over the very edges of a triangle.
- 1/3 View Dist - These tris will only come into view at 1/3 the max distance (determined by the
'view distance' slider under options in the game. Makes things faster. Set this for little stuff like
controls, rocks, and details that you wouldn't see from far away.
- 2x View Dist - Makes things visible at twice the normal distance. Only used for really big tris,
like water.
- Object File Texture - Sets this texture as an object file texture. You MUST have an object file
loaded to save these, otherwise bad things could happen. Object files hold the per-event parts of the map,
like the controls, streamers, and finish area stuff. The main map file holds the per-map stuff, like the
ground, water, and buildings - stuff that doesn't change between events. Notice that there are two different
save buttons in the file menu for the map file and the
object file.
|
 |
View -> Zoom In
Shortcut key: + (on the main keyboard, not the keypad)
Zooms the map view in (in 2d mode).
View -> Zoom Out
Shortcut key: - (on the main keyboard, not the keypad)
Zooms the map view out (in 2d mode).
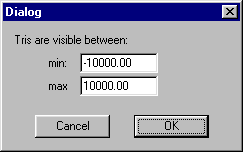
View -> Set Y Range
|
Sets the visible Y range. Useful if you want to cut off everything above or below a certain height.
|
 |
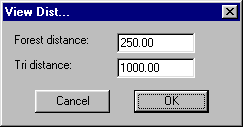
View -> Set View Dist
|
Sets the view distances for the editor. Lower these if the editor runs slowly.
- Forest distance - This is the visible forest (trees) distance. After changing this you should
rebuild the forest quadtree.
- Tri distance - Max view distance for tris.
|
 |
View -> Wireframe
Shortcut key: F2
Toggles wireframe mode.
View -> Show Trees
Toggles tree visibility. Useful if you're editing the ground and don't want the trees in the way.
View -> Follow Terrain
Locks the view to 2m above the ground (in 3d view) when set. Uncheck to fly around.
View -> 2D
Shortcut key: Space bar
Toggles the view into 2D (overhead view) mode.
View -> 3D
Shortcut key: Space bar
Toggles the view into 3D mode.
Tutorial Index -
CF Home
|
