When you start to convert an OCAD map, you get the option to select a specific forest type for the conversion. This is a very convenient feature, since it allows you to set the forest properties once and then reuse it on as many maps as you want. Here's how you can add your own forest types to that list.
1. Start the OCAD Converter
2. Select any OCAD file, and in the Convert Ocad File window select the forest type that you want to use as a "template" for your own forest.
3. Start a user-controlled OCAD conversion and go to Step 2. Check Symbol Set in the conversion process. (It doesn't matter which region you select during step 1.)
4. Select any vegetation area symbol in the symbol list (it doesn't matter if the symbol is in the Ok Symbols or Not in Convert Area group). You can for example select the white forest symbol 405.0.
5. Open the vegetation area's parameters (by pressing the + sign at the symbol) and select AreaVegetation parameter.
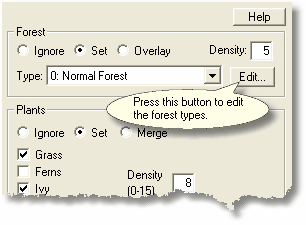
6. In the pane that displays at the bottom left, press the Edit... button:
7. The Edit Forest Types... dialog box will now open. Make the changes you need to the different forest types. You can access all the defined forest types here by using the Forest Type: dropdown.
8. Save the forest in a new file with a new name by pressing the Save... button
9. When the forest has been saved, press the Cancel button and then close the OCAD Converter without continuing with the conversion. The forest type file that you just saved is now ready for use in any OCAD map that you want to convert.